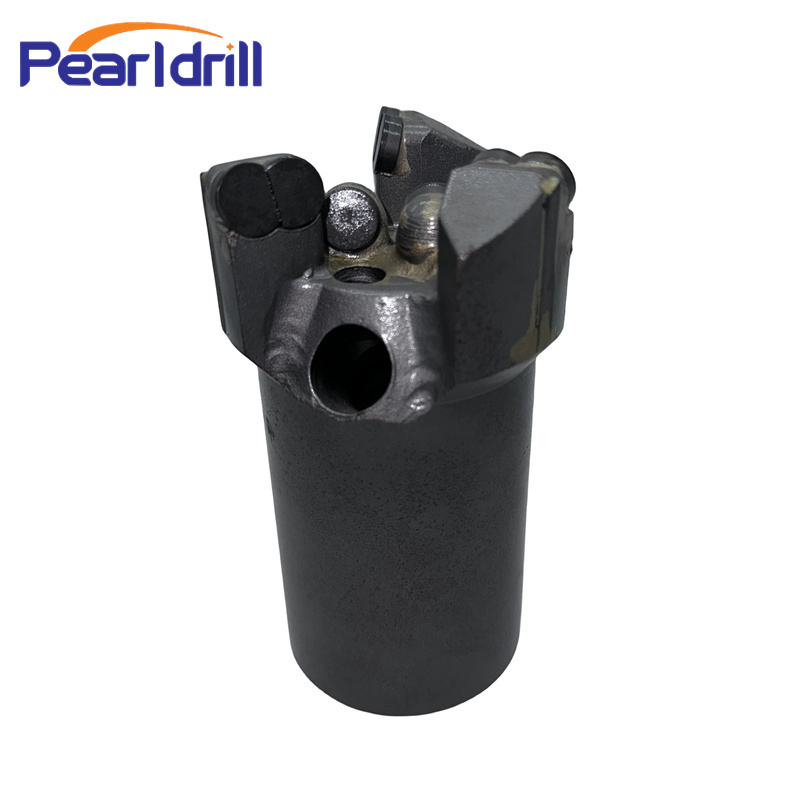
What is a Three-Wing Concave Water Well Grouting Holes Coreless Drill Bit used for
This thing called a "Three-Wing Concave Water Well Grouting Holes Coreless Drill Bit" is a special kind of drill bit. It's mainly used when you're working on water wells to make holes for grouting. The important things about it are the "three wings," the "concave shape," and that it's "coreless."

What It's Used For
1. Making Grouting Holes: The main idea is to drill holes in specific layers of the ground in a water well. This lets you pump in cement slurry or other grouting stuff into cracks, empty spaces, or loose parts of the soil and rock. This does a few things:
Makes the ground stronger and more stable so the well walls don't collapse.
Seals up cracks and pathways where water can leak in, so less or no groundwater gets into the well.
Makes bad ground conditions better, which helps with building the rest of the well or using it for a long time.
2. Good for Certain Ground: The "concave" shape might be better for some types of ground where you have both hard and soft layers or ground that breaks easily. It can break up the soil and rock more effectively.
3. Drilling Without a Core: "Coreless" means that when you drill, you don't pull out a solid sample of the rock. This way of drilling is usually faster and is used when you just need to make a hole for grouting and don't need to see exactly what the ground is made of.
How to Use It
The way you use a three-wing concave water well grouting holes coreless drill bit usually follows these steps, but you might need to change things depending on the type of drilling machine, the ground conditions, and your project plan:
1. Getting the Drilling Machine Ready:
Pick the right drilling machine that has enough power to drill the holes you need.
Connect the drill rod to the three-wing concave water well grouting holes coreless drill bit. Make sure it's connected tightly and safely.
Get your drilling fluid ready (usually mud or water). This helps cool the drill bit, carries away the rock pieces, and keeps the hole from collapsing.
2. Starting the Hole:
Based on the water well design and the grouting plan, figure out where the grouting holes need to be and at what angle.
Start the drilling machine slowly so the drill bit starts drilling in the right spot.
3. Drilling:
Control the pressure and speed: Depending on how hard the ground is and how the drill bit works, carefully control how much pressure you put on the drill and how fast it spins to get the best drilling.
Keep pumping in drilling fluid: Continuously pump in drilling fluid to keep the drill bit cool and to get the broken rock out of the hole.
Watch how the drilling is going: Pay close attention to the pressure gauges and electricity meters on the drilling machine, as well as the rock pieces coming out. This helps you know what kind of ground you're in and how the drill bit is working.
Change settings if needed: If the ground changes, adjust the pressure, speed, and the type of drilling fluid you're using.
4. Reaching the Right Depth:
Drill down to the depth that the grouting plan says you need to go.
Sometimes, you might need to do grouting at different depths, so you'll need to stop drilling at those different levels.
5. Pulling Out the Drill:
Stop the drilling machine and slowly pull the drill rod and drill bit out of the hole.
While you're pulling it out, you can keep pumping in drilling fluid to help keep the hole from collapsing.
6. Grouting:
Put the grout pipe into the hole you just drilled, making sure it goes down to the right depth.
Connect the grout pump and pump the cement slurry or other grouting material through the pipe into the ground.
Control the pressure and amount of grout you're pumping in based on the grouting plan.
7. Drilling and Grouting Again:
Depending on the water well design and the ground conditions, you might need to drill more grouting holes in different places and at different depths, and do the grouting process multiple times.
8. Cleaning and Taking Care of the Drill Bit:
After you're done drilling and grouting, clean off any rock pieces and mud from the drill bit right away.
Check the drill bit for any wear or damage. If it's worn out or broken, replace or fix it.
Click the link contact us to learn more about our products and deals!
Three-Wing Concave Water Well Grouting Holes Coreless Drill Bit
